Quantcast
Channel: Microsoft Archives - Nutanix HCI and hybrid cloud
Viewing all 55 articles
Browse latest View live

Public Beta VMware vCenter Multi-Hypervisor Manager

$
0
0

Finally VMware realized that ESXi is not the only one bear metal hypervisor on the Earth and couple days ago VMware informed about public BETA test for upcoming  VMware vCenter Multi-Hypervisor Manager 1.1  – sign up for it !! In a MHM 1.1 version Hyper-V on Windows 2012 is supported that’s why is worth to look at it. Wondering if VMware has in plans extend support for KVM, would be nice.

What’s new

  • Migration of virtual machines from Hyper-V to ESX or ESXi hosts.
  • Support for the latest Microsoft Hyper-V3 hypervisor (as well as the earlier versions).
  • Increased scalability with regards to the number of supported third-party hosts to 50 (from 20 in MHM 1.0).
  • Ability to provide custom certificates for the MHM server from the installer wizard.
  • Multiple objects selection in the UI and a number of other usability improvements.
  • Plus a number of server and client-side bug fixes.
VMware MHM logica design

VMware MHM logica design

HAPPY TESTING ALL :-)

Read more about MHM and how-to sign-up for BETS test

The post Public Beta VMware vCenter Multi-Hypervisor Manager appeared first on VMwaremine - Mine of knowledge about virtualization.


VMware vCenter Converter Standalone 5.5

$
0
0

VMware vCenter Converter Standalone 5.5 has been released with new features:

  • Support for virtual machine hardware version 10 (62TB disks, virtual SATA controllers, etc.)
  • Support for RedHat KVM virtual machines as a source
  • A new option for selecting the network adapter for the target virtual machine
  • Support for additional guest operating systems
  • Parallel disk conversions
  • Virtual SAN support
VMware vCenter Converter 5.5

VMware vCenter Converter 5.5

The post VMware vCenter Converter Standalone 5.5 appeared first on VMwaremine - Mine of knowledge about virtualization.

Unable to add Windows 2008 to AD

$
0
0

From time to time anyone can make stupid mistake, typo or just simply make a wrong assumption. This time it was me Laughing. Whenever I tried to deploy VM with Windows 2008 R2 or with Windows 7 it never got add to Windows AD automatically, even if I specified domain and valid credentials in vSphere customization profile. So, it took me a while to discover where was a problem, wrong domain name and credential format. Which used to work with Windows 2003 and Windows XP.

Just in case you didn’t know it before, make sure that you put domain and credentials into customization in the same format like below:

  • Domain – FQDN of domain
  • credentials: username@domain_FQDN
domain details and credentials

domain details and credentials

The post Unable to add Windows 2008 to AD appeared first on VMwaremine - Mine of knowledge about virtualization.

vCAC 6 series – Part 10 – Prepare for provisioning

$
0
0

There are several ways to deploy virtual machines with vCloud Automation Center 6.0 and vSphere.

Link Clone

Provision a space-efficient copy of a virtual machine called a linked clone. Linked clones are based on a snapshot of a VM and use a chain of delta disks to track differences from a parent machine. No required pre-provisioning preparations for link clone.

Clone

Provision machines by cloning from a template object created from an existing Windows or Linux machine (called the reference machine) and a customization specification

Flex Clone

Provision a space-efficient copy of a virtual machine by using NetApp FlexClone technology.

Preparing Linux and Windows VM for Flex Clone or Clone

When VM is deployed by flex clone or clone.

Windows
  • Navigate to the vCloud Automation Center Appliance management console installation page.
  • For example: https://vca01.lab.local:5480/installation.
  • Download and save the Windows guest agent files.
    • Windows guest agent files (32-bit.)
    • Windows guest agent files (64-bit.)

    builders

    builders

  • Unpack GugentZip_version in C:\ on the reference machine.
  • This produces the directory C:\VRMGuestAgent. Do not rename this directory.
  • Configure the guest agent by running the following command in an elevated command prompt: winservice -i -h Manager_Service_Hostname_fdqn[:portnumber -p ssl.
  • For example: winservice -i -h vca02.lab.local:443 -p ssl

C:\VRMGuestAgent>winservice -i -h vca02.lab.local:443 -p ssl
Service installed successfully
C:\VRMGuestAgent>

  • After installation new service should appear in Windows Services called VCACGuestAgentService
  • Power server off and convert to template
Linux
  • Download package from vCAC appliance to Linux server
  • Unpack the LinuxGuestAgentPkgs file.
  • Navigate to the LinuxGuestAgentPkgs file and locate the subdirectory that corresponds to the guest operating system that you are deploying during provisioning.
  • Install the guest agent using the RPM package.
  • For example, rpm -i gugent-6.0.0-2025.x86_64.rpm.

[root@localhost rhel6-amd64]# rpm -ivh gugent-6.0.1-71.x86_64.rpm
Preparing...                ########################################### [100%]
   1:gugent                 ########################################### [100%]
[root@localhost rhel6-amd64]#

  • Add agent installation path to $PATH

[root@localhost ~]# export PATH=$PATH:/usr/share/gugent

  • Change directory to /usr/share/gugent
  • Configure the guest agent to communicate with the Manager Service by running ./installgugent.sh -Manager_Service_Hostname_fdqn:portnumber ssl.
    [root@localhost share]# cd /usr/share/gugent
    [root@localhost gugent]# ./installgugent.sh vca02.lab.local:443 ssl
    [root@localhost gugent]#

The post vCAC 6 series – Part 10 – Prepare for provisioning appeared first on VMwaremine - Mine of knowledge about virtualization.

Nutanix basics – Nutanix Foundation – part 2

$
0
0

Nutanix Foundation 1.2.1 – part 2

In first part of Nutanix Foundation series I blogged out how to configure and prepare your Nutanix Foundation VM for deployment on Nutanix blocks.

Prepare Nutanix block for provisioning.

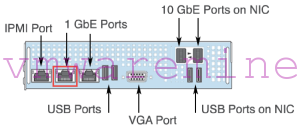
Connect each Nutanix block by at least single cord to network switch. In a backplane you will find 3 X RJ45 sockets – plug cable into middle one. It is shared port between IPMI module and SuperMicro server.

Nutanix block backplane

Nutanix block backplane – pic. from Nutanix doc.

Start Nutanix Foundation VM and go to Nutanix Foundation portal web page – no credentials are required http://Nutanix_foundation_IP:8000/gui/index.html . You should end up on webpage where you can provide and configure different cluster parameters such as IP, gateways, DNS, NTP.

Working with Nutanix foundation.

NOTE: before you start make sure IPv6 is enabled on PC which is used to host Nutanix Foundation VM.

When you open Nutanix Foundation portal for a first time it should automatically discover empty Nutanix nodes over IPv6. Nutanix Foundation portal is divided by three sections:

  1. Set the global configuration for the blocks
  2. Configure blocks and nodes.
  3. Choose the ISO images that you want to install.

First section is where you define global settings for your deployment like:

  • netmasks for IPMI, CVM, hypervisor
  • gateways for IPMI, CVM, hypervisor
  • IPMI username and password, default IPMI username is: ADMIN and password: ADMIN
  • hypervisor DNS
  • CVM memory size
Nutanix Foundation portal - global settings

Nutanix Foundation portal – global settings

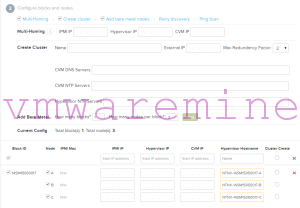
Second section is where you configure block, nodes and cluster Multi-homing:  If you are using a flat switch (no routing tables) for installation, check the Multi-Homing box. The purpose of the multi-homing feature is to allow the Foundation VM to configure final production IP addresses for IPMI, hypervisor, and Controller VM while using an unmanaged switch.

NOTE: If this box is not checked, Foundation requires that either all addresses are on the same subnet or that the configured IPMI, hypervisor, and Controller VM IP addresses are routable. 
Nutanix Foundation - second section

Nutanix Foundation – second section

Create a cluster Using Nutanix Foundation you can automatically create NOS cluster after deployment. In this section provide:

  • cluster name
  • external IP (virtual IP), you can reach out one of the Controller VM in the cluster and NOS cluster PrismUI
  • max redundancy factor – setting it on 2 means cluster can tolerate up to one node or disk failure, setting it on 3 can be enabled only after cluster is created and cluster need to have at least 5 nodes.

NOTE: Redundancy factor 3 is available only with Nutanix OS 4.0 and later
Add metal nodes. Nutanix Foundation can image nodes without any NOS software installed. Enter number of blocks and nodes per block. When you deploy bare metal block MAC address of IPMI interface is required for provisioning. MAC address can be found on the back of Nutanix block, just below the middle 1Gbps plug.
Nutanix Foundation - bare metal and standard block

Nutanix Foundation – bare metal and standard block – pic from Nutanix docs

In the lower middle section of the screen, configure the nodes as follows: This section displays information about the discovered nodes. The size of this section varies and can be quite large when many blocks are discovered. It includes columns for the block ID, node, IPMI Mac address, IPMI IP address, hypervisor IP address, CVM IP address, and hypervisor host name. A section is displayed for each discovered block with lines for each node in that block. If you added bare metal blocks in the previous step, those blocks also appear Provide all required information a move to next step. On the bottom section do the following, In the Phoenix ISO image field, select ISO image you’ve downloaded previously from the pull-down list. In the Hypervisor ISO image choose hypervisor ISO image from drop-down list. Verify one more time all information provided and click Run Installation button. Depending on number of nodes and hypervisor type installation might take up to one hour. You can follow-up on installation progress by staying on Nutanix Foundation portal and refresh log window from time to time. And you are DONE, three nodes Nutanix OS cluster provisioned and configured.

Nutanix Foundation - progress installation window

Nutanix Foundation – progress installation window

From a log below can notice installation started at 04:16:46 local time and finished at 04:46:01 – provision, configure  3 nodes with ESXi 5.5 took about 30 minutes

20140728 041646: Powering up node
20140728 041706: Attaching virtual media: /home/nutanix/foundation/tmp/fuse/esx_node_0.iso
20140728 041742: Checking virtual media: /home/nutanix/foundation/tmp/fuse/esx_node_0.iso
20140728 041742: >vmwa status
Device 1: None
Device 2: ISO File [/home/nutanix/foundation/tmp/fuse/esx_node_0.iso]
10.1.222.26 X9DRT-HF+ (S0/G0,108w) 04:17 SIM(WA)SIM(WA)
20140728 041742: Resetting node
20140728 041742: Powering up node
20140728 042341: esx_installing
20140728 043023: esx_rebooting
20140728 043023: Exiting SMCIPMITool
.
.
.
.
0140728 044549: INFO: Setting vSwitch NIC failover policy for vswitch 'vSwitch0' to: active_nics=['vmnic2'], standby_nics=['vmnic3', 'vmnic0', 'vmnic1']
20140728 044552: INFO: Adding NIC vmnic2 to activeNic policy
20140728 044552: INFO: Adding NIC vmnic3 to standbyNic policy
20140728 044552: INFO: Adding NIC vmnic0 to standbyNic policy
20140728 044552: INFO: Adding NIC vmnic1 to standbyNic policy
20140728 044554: INFO: Allowing service 'sshClient' in host firewall
20140728 044555: INFO: Allowing service 'nfsClient' in host firewall
20140728 044556: INFO: Changing the value of 'Misc.APDHandlingEnable' from '1' to '0'
20140728 044558: INFO: Changing the value of 'NFS.HeartbeatTimeout' from '5' to '30'
20140728 044559: INFO: Changing the value of 'NFS.MaxVolumes' from '8' to '64'
20140728 044600: INFO: Changing the value of 'Net.TcpipHeapSize' from '0' to '32'
20140728 044601: INFO: Changing the value of 'Net.TcpipHeapMax' from '256' to '128'

See my Nutanix Foundation part 3 for post installation steps.

The post Nutanix basics – Nutanix Foundation – part 2 appeared first on VMwaremine - Mine of knowledge about virtualization.

Cannot add library server in SCVMM 2012 R2

$
0
0

Cannot add library server in SCVMM 2012 R2 

Few days ago I deployed SCVMM 2012 R2  U5 failover cluster. When SCVMM run on  failover cluster installation process skips the SCVMM Library configuration part – you have to add Library to SCVMM server manually after deployment is finished. There are few possibilities:

  • Use separate standalone server for Library
  • use one of the SCVMM Failover cluster nodes as library server
  • or any other Windows server which can work as file server

If you would like to have HA on Library server use Windows file server in failover cluster.

Adding SCVMM Library server into SCVMM 2012R2 deployment is trivial and generally does not take longer than 2 minutes but …. there is always but :-) … due to GUI bug in new SCVMM 2012 R2 U5 – took me few hours to do it. I was not able to ad Library server into my SCVMM 2012 R2 failover cluster – there was no error – nothing – simply empty Task window pop up with no info inside.
I had to use Powershell to find out what is going on. As you can see below – I was using the same service account  which was already used by SCVMM services to run on.  Solution was simple – create new run as account for SCVMM library server and use it.

PS C:\Users\artur> Add-SCLibraryServer -ComputerName "scvmm01.gso.lab" -Description "" -
JobGroup "3cbcd860-757a-4bd2-8aa8-2e42e4124aa0" -RunAsynchronously -Credential $credential
Add-SCLibraryServer : The specified user account cannot be the same as the VMM service account. (Error ID: 10421)

Specify a different account and then try the operation again.
At line:1 char:1
+ Add-SCLibraryServer -ComputerName "scvmm01.gso.lab" -Desc ...
+ ~~~~~~~~~~~~~~~~~~~~~~~~~~~~~~~~~~~~~~~~~~~~~~~~~~~~~~~~~~~~~~~~~~~~~~~~~~~~~~~~
    + CategoryInfo          : ReadError: (:) [Add-SCLibraryServer], CarmineException
    + FullyQualifiedErrorId : 10421,Microsoft.SystemCenter.VirtualMachineManager.Cmdlets.AddLibraryCmdlet
PS C:\Users\artur>


The post Cannot add library server in SCVMM 2012 R2 appeared first on VMwaremine - Mine of knowledge about virtualization.

Generation 2 virtual machine support on Azure

$
0
0

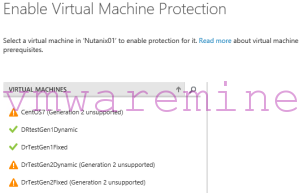
I’ve seen some information about Hyper-V Generation 2 virtual machines are now supported on Azure. Asking around and looking at MSFT official documentation or several blog posts I got confused. Some sources says it is supported some sources says – not supported. I decided to test it. I’ve created several VMs on my Nutanix test lab and included them into Private cloud on SCVMM. Workloads in my SCVMM private cloud are in protected by Azure Site Recovery to Azure. Location of my Protect vault and storage account is Western Europe. As you can see Generation 2 VMs are not supported by ASR to Azure – at least in my  GEO region.
Generation 2 VM support on Azure

Generation 2 VM support on Azure

The post Generation 2 virtual machine support on Azure appeared first on VMwaremine - Mine of knowledge about virtualization.

How to make Hyper-V Virtual machine highly available

$
0
0

Maybe this is silly topic but for someone who spent 8+ years working with VMware technology jumping over to Microsoft software stack it is not always easy :-). General thinking and assumption was:

When I have VM running on the cluster – my assumption was – it must be protected by HA, right ?

The answer is, no :-) .When you run VM on Hyper-V it is not protected by failover cluster by default. There are few ways how you can enable high availability on on Virtual Machine run on top of Hyper-V failover cluster.

#1 – How to make Hyper-V Virtual machine highly available – using Live Migration

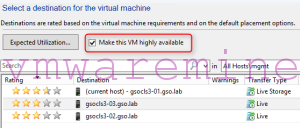
  • Log in to SCVMM server via client
  • From right-click menu choose LiveMigration
  • Check – Make this VM highly available
  • When task is completed VM is protected by Microsoft failover cluster.
Hyper-V LiveMigration

Hyper-V LiveMigration


#2 – How to make Hyper-V Virtual machine highly available – by adding VM in failover cluster resources

  • Start failover cluster manager and connect you failover cluster
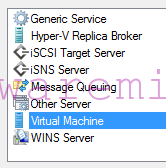
  • Click on Role and Add new role
  • Select Virtual Machine role
Add VM into failover cluster resources

Add VM into failover cluster resources

  •  Select Virtual machines
  • Next –> Next and Finish
  • Done
VM protected by failover cluster manager

VM protected by failover cluster manager

All selected VM will be protected by failover cluster

What if I want to have VM protected by HA automatically? Enable it on VM template. Every new VM will be automatically added to failover cluster resources after deployment.

Edit VM template, under Hardware Configuration –>Advance –> Availability check box next to Make this virtual Machine highly available

make virtual machine highly available

make virtual machine highly available


The post How to make Hyper-V Virtual machine highly available appeared first on VMwaremine - Mine of knowledge about virtualization.


WAPack – The current user does not have administrative privileges

$
0
0

I spent some time at my lab to build up private cloud based on Microsoft Windows Azure Pack running on top of Nutanix and Hyper-V. I have to admit it went better then I was expecting. Obviously, I hit few issues (OK, more then few :-)) one of them was problem with start configuration wizard after WAP services installation. When you deploy one of the WAP services, at the end of the installation, installer starts web browser on address https://localhost:30101/ to complete service configuration.

In my case, page was loaded however I saw message :

 The current user does not have administrative privileges. Please run the browser in elevated mode.

Following error message recommendation, I started IE in elevated mode – guess what I saw  on screen? :-)

The current user does not have administrative privileges. Please run the browser in elevated mode.

The current user does not have administrative privileges. Please run the browser in elevated mode.

After few tries, I decided to hit configuration service page from remote browser – and it worked. I was able to complete WAP setup from remote computer but not from local.

The post WAPack – The current user does not have administrative privileges appeared first on VMwaremine - Mine of knowledge about virtualization.

Expand VHD Hyper-V virtual machine disk

$
0
0

When you run virtual machine on Hyper-V in cluster mode – protected by Hyper-V HA services you have to use Microsoft failover cluster manager to Expand VHD Hyper-V virtual machine disk drive.

  • Shutdown virtual machine
  • Start Failover cluster manager
  • Connect to Hyper-V failover cluster
  • Click on roles
  • From right click menu click on VM settings
2015-05-04_13h01_33

Expand VHD Hyper-V virtual machine disk

  • Mark disk –> Edit –> Next
  • From Choose action menu à Expand
  • Provide new disk size
  • Confirm new disk size

Next step is to expand partition on virtual machine guest operating system

The post Expand VHD Hyper-V virtual machine disk appeared first on VMwaremine - Mine of knowledge about virtualization.

Download System Center technical Preview 2

$
0
0

Unable to upgrade the deployment. The requested VM size ‘A9′ may not be available in the resources supporting the existing deployment

$
0
0

While working with Azure Site Recovery manger and performing failover test for many, many times I faced several issues. Below is one issue and workaround I would like to share with you.

Failover scenario:

  • AD and DNS server (Group 1)
    • 2 vCPU
    • 3 GB RAM
    • 40GB HDD
    • Azure VM size – A2
  • DB server (Group 2)
    • 4 vCPU
    • 32 GB RAM
    • 200 GB disk
    • Azure VM size – A9
  • APP server (Group 3)
    • 2 vCPU
    • 6 GB RAM
    • 60GB HDD
    • Azure VM size – DC

I created recovery plan with three groups (see above) and each VM in failover scenario has default VM sizes configured in Azure. Group 1 failed over successfully, only group 1 :-( . Servers from remaining groups got below error while failover to Azure.

Update-AzureVM : Compute.CannotUpgradeDeploymentToNewRoleSize : Unable to upgrade the deployment. The requested VM size ‘A9′ may not be available in the resources supporting the existing deployment. Please try again later, try with a different VM size or smaller number of role instances, or create a deployment under an empty hosted service with a new affinity group or no affinity group binding.

What had happen is when recovery plan consists of VMs in different sizes and first VM in recovery plan has small size (like AD and DNS server in my case) then Azure services automatically “assign” all VMs from recovery plan to services where only small VMs can be created. I hope it make sense what I’ve wrote above 😉

What is the work around – change default Azure VM size for first VM from recovery to the biggest VM size in recovery plan.

How to change VM Azure size for protected virtual machines.

  • Log in to Azure management portal
  • Got to Recovery Services –> Protected Items –> VMM clouds
  • click on VMM cloud  and from virtual machines tab choose VM to change size for
  • On configure tab choose Azure VM size from drop down menu
Change Azure VM size

Change Azure VM size

The post Unable to upgrade the deployment. The requested VM size ‘A9′ may not be available in the resources supporting the existing deployment appeared first on VMwaremine - Mine of knowledge about virtualization.

Ensure that the SQL Server is running and configured correctly, and try the operation again. ID: 2604

$
0
0

Yesterday morning I tried to login to SCVMM 2012R2 and I got below error. I logged it to MSSQL server over SQL Management studio to check out if availability groups are fine. After around 10 minutes of investigation I found out LOG partition on SQL server run out of free space. I had to extend LOG virtual disk drive, extend LOG partition on MSSQL server and restart SCVMM services to make it working again.

Database operation failed. Ensure that the SQL Server is running and configured correctly, and try the operation again. ID: 2604

If you are wondering how to extend virtual disk on Hyper-V 2012 R2 click on this link

The post Ensure that the SQL Server is running and configured correctly, and try the operation again. ID: 2604 appeared first on VMwaremine - Mine of knowledge about virtualization.

Install Linux VM on Hyper-V 2012 R2

$
0
0

Quick guide how to Install Linux VM on Hyper-V 2012 R2

Some time ago Microsoft “kindly” allow their customers to run Linux workloads on Hyper-V. There are several Linux distribution supported on Hyper-V 2012 R2:

  • CentOs 5 ,6 and 7
  • Ubuntu 12.X and 14.X
  • Suse Linux Enterprise server from 9, 10, 11, 12
  • Redhat 3, 4, 5, 6, and 7
  • Oracle Linux 5, 6, 7
  • Debian 7

To get support on Hyper-V for latest Linux releases you must create VM with Generation 2 and disable secure boot in virtual machine

Uncheck Enable secure boot

Uncheck Enable secure boot

The post Install Linux VM on Hyper-V 2012 R2 appeared first on VMwaremine - Mine of knowledge about virtualization.

Deploy F5 BIG-IP VE on Hyper-V

$
0
0

Quick and easy step by step guide how to Deploy F5 BIG-IP VE on Hyper-V

What is F5 – I think I don’t have to explain here. Since some time F5 released Virtual Edition for their flagship product  BIG-IP. It is supported on various hypervisor platforms:

  • KVM – different vendors
  • Microsoft Hyper-V 2008R2 and 2012R2
  • VMware ESXi – since 5.X
  • XENServer – 5.5 and newer
Below quick guide how to deploy BIG-IP VE on Hyper-V 
  • Download virtual disks package from F5 download page
  • UnZip it and either copy over to SMB share (if you have VMM only) or copy to Library (if you have SCVMM 2012(r2) deployed
  • Star VMM manager or SCVMM and create new VM
    • 2 vCPU (for Lab)
    • 2GB – 4GB RAM
    • 4 vCPU (PROD)
    • 8GB RAM (full memory reservation)
    • and minimum of 3 network adapters
      • mgmt
      • internal
      • external
    • virtual disk
      • leave default size for lab
      • extend to 80GB or 100GB for PROD
F5 virtual hardware config on hyper-V

F5 virtual hardware config on hyper-V

  • Power it on and log in to console
    • default F5 credentials: root\default
    • type: config
    • and provide IP details for management interface
F5 default IP configuration

F5 default IP configuration

  • Once is done then go to IP address over https and log in to web based config tool
    • default F5 credentials are: admin\admin
F5 config web page

F5 config web page

After log it to appliance you have to register license key and than continue F5 system configuration.

The post Deploy F5 BIG-IP VE on Hyper-V appeared first on VMwaremine - Mine of knowledge about virtualization.


Remove tenant user from Windows Azure Pack

$
0
0

The only way (known to me) to remove tenant user  from Windows Azure Pack is by using Powershell. Below simple script to remove tenant user from Windows Azure Pack. Run it from one of the Windows Azure Pack servers.

# credentials for performing actions
$AuthSite = <IP or FQDN of AdminAuthenticationSite>:30072
$Credential = Get-Credential
$token = Get-MgmtSvcToken -Type Windows -AuthenticationSite $AuthSite -ClientRealm "http://azureservices/AdminSite" -User $credential -DisableCertificateValidation
$emailaddress='artur(at)NutanixDotCom'

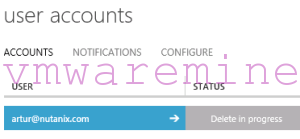
Check portal, you should see “Delete in progress” in management portal.

WAP deletion pending user

WAP deletion pending user


$adminApiUri = <AdminAPIService IP or FQDN>:30004

PS C:\Windows\system32> Get-MgmtSvcUser -AdminUri $adminApiUri -Token $Token -First 5

Name                : artur(at)NutanixDotCom
Email               : artur(atNutanixDotCom
State               : DeletePending
CreatedTime         : 4/1/2015 8:12:32 AM
SubscriptionCount   : 0
ActivationSyncState : Syncing
LastErrorMessage    : 
ExtensionData       : 

PS C:\Windows\system32> Remove-MgmtSvcUser -AdminUri $adminApiUri -Token $token -Name $emailaddress

PS C:\Windows\system32> Get-MgmtSvcUser -AdminUri $adminApiUri -Token $Token -First 5

PS C:\Windows\system32>


The post Remove tenant user from Windows Azure Pack appeared first on VMwaremine - Mine of knowledge about virtualization.

How to install updates on Hyper-v cluster running on the Nutanix

$
0
0

If you have Nutanix in your datacenter you are free to choose between three different hypervisors, Acropolis Hypervisor aka AHV (Nutanix KVM based hypervisor), Microsoft Hyper-V 2012R2 and VMware ESXi 5.1 or newer.

Note: VMware ESXi 6.0 is supported too, on NOS 4.1.3 and newer.

I decided to write up quick tutorial on How to update Hyper-v failover cluster on Nutanix because many people wondering how to do it, there is a lot of FUD spread by some people referring to complexity and how risky this operation is. Below I will show you how easy and quickly you can install updates on Hyper-V cluster running on the Nutanix.  To install updates on Hyper-v cluster running on the Nutanix, Nutanix recommend Cluster-Aware Utility. Cluster-Aware Utility is standard Microsoft tool.

You have to be NOS 4.0.2 or newer.
  • Download powershell pre-upgrade script from Nutanix repo, you can find link to it on portal.nutanix.com
  • Upload powershell pre-upgrade script to every Hyper-V node in cluster and to CAU servers under the same location. Default location is c:\Program Files\Nutanix\Utils\ but you can place pre-upgrade script on SMB share. Make sure that share is accessible by all the hosts in cluster and by workstation were you are running CAU from.
  • Change Powershell Execution Policy to unrestricted on every host in Hyper-V cluster
    powershell.exe  Set-ExecutionPolicy RemoteSigned
  • Enable file file – below is the default path to pre-update script file. Remember to provide correct path to the file.
    powershell.exe Unblock–File -Path 'C:\Program Files\Nutanix\Utils\cau_preupdate.ps1'
  • Start Cluster-Aware Utility
  • Click on Create or modify Updating Run Profile
  • In Pre-Upgrade field, type path to pre-upgradePowerShell script uploaded previously
CAU - configure new profile

CAU – configure new profile

  • Save CAU configuration as new profile into XML file. Default location is c:\Windows\system32\

That is for preparation work, time to install updates

  • Start CAU tool or failover cluster utility.
  • Connect to Hyper-V cluster.
  • Load Nutanix update profile you have created previously.
  • Click on either Preview updates on this cluster or Apply
Install windows updates on Hyper-V

Install windows updates on Hyper-V

Do not stop or log out server where your CAU tool is running from.

Wait for operation to complete. CAU tool with pre-upgrade script will upgrade all nodes Hyper-V cluster, one by one. In the background CAU is:

  • scanning Hyper-V nodes for updates (all at time)
  • downloading updates on Hyper-V nodes  (all at time)
  • migrating VMs out of the Hyper-V node (one at time)
  • installing updates
  • reboot Hyper-V node
  • wait for CVM to boot

When patching is completed change, change Execution policy back to the one was set before patching. Remember to set it on all servers in the Hyper-V cluster.

powershell.exe  Set-ExecutionPolicy

About Artur Krzywdzinski

Artur is Consulting Architect at Nutanix. He has been using, designing and deploying VMware based solutions since 2005 and Microsoft since 2012. He specialize in designing and implementing private and hybrid cloud solution based on VMware and Microsoft software stacks, datacenter migrations and transformation, disaster avoidance. Artur has been in IT industry since 1999 and consulting since 2008. Artur holds VMware Certified Design Expert certification (VCDX #077).

The post How to install updates on Hyper-v cluster running on the Nutanix appeared first on VMwaremine - Mine of knowledge about virtualization.

Deploy Microsoft failover cluster on Nutanix

$
0
0

Microsoft Failover Cluster  is supported on Nutanix. I will use fileshare witness as quorum. Therefore, first step is create container on Nutanix and add Microsoft failover cluster nodes to container whitelist.

  • Prepare ShareFile Witness on Nutanix – create container and make sure you have added cluster nodes IP to container filesytem whitelists
container whilelist

container whitelist

  • Deploy two virtual machines with Windows 2012 R2
  • Each VM should have 2 vNIC,
    • mgmt traffic
    • HB traffic
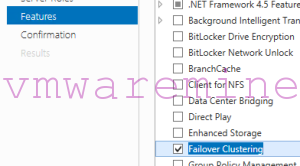
  • Install Microsoft Failover Clustering feature on both servers
Microsoft Failover Clustering feature

Microsoft Failover Clustering feature

  • Verify if you can browse SMB share on Nutanix from both servers.
  • Start Failover Cluster utility and create failover cluster
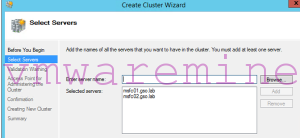
  • Select servers

    Select cluster nodes

    Select cluster nodes

  • Keep validation warning default – do not change it
  • On Test validation, mark Run all Tests
  • Provide cluster name and cluster IP address

    MSFC cluster name and IP address

    MSFC cluster name and IP address

  • Verify information on Confirmation page, if all good – go on and click Next
  • After few second summary page will pop up with all cluster information

    Failover cluster created

    Failover cluster created

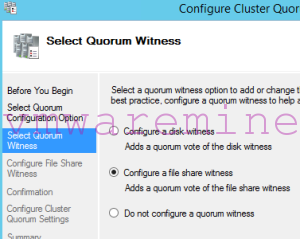
Next step is to configure cluster quorum. As mentioned before, we will use file share witness, which is Nutanix SMB share we have created at the beginning of this tutorial.

  • Connect to failover cluster
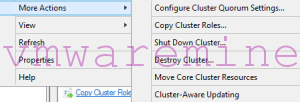
  • Right click on cluster –> More ACtions –> Configure Cluster Quorum Settings

    Configure cluster quorum

    Configure cluster quorum

  • Choose Select quorum Witness
  • On next screen – Configure a file share witness

    2015-08-07_09h22_16

    Configure file share witness

  • Provide path to SMB share on Nutanix you have configured before. In my example it is
    \\gsocls3-smb\msfcwitness\
  • Verify provided information and click finish.

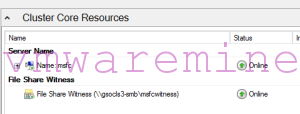
Done, you have now Microsoft failover cluster on Nutanix. When you click on Microsoft failover cluster you can see all info about, including fileshere witness.

Microsoft failover cluster on Nutanix - information

Microsoft failover cluster on Nutanix – information

About Artur Krzywdzinski

Artur is Consulting Architect at Nutanix. He has been using, designing and deploying VMware based solutions since 2005 and Microsoft since 2012. He specialize in designing and implementing private and hybrid cloud solution based on VMware and Microsoft software stacks, datacenter migrations and transformation, disaster avoidance. Artur has been in IT industry since 1999 and consulting since 2008. Artur holds VMware Certified Design Expert certification (VCDX #077).

The post Deploy Microsoft failover cluster on Nutanix appeared first on VMwaremine - Artur Krzywdzinski | Nutanix.

Configure LiveMigration network on Hyper-V running on Nutanix

$
0
0

Microsoft Networking best practice advice to run LiveMigration traffic on separate VLAN. Personally I think this is very good idea to isolate different traffic types (management, VM, SVC, LiveMigration, storage) from each other.

In example below I will show how to Configure LiveMigration network on Hyper-V running on Nutanix. I will use PowerShell, of course :-)

First things first. Let me explain Hyper-V networking concept on Nutanix. After deployment, you can find two Logical Switches – InternalSwitch and ExternalSwitch. Internal switch is used only for local CVM to local Hyper-V host communication, has no physical uplinks bounded . ExternalSwitch – as name states – is used for external communication between CVMs, Hyper-V hosts, virtual machine traffic, LiveMigration. ExternalSwitch has LBFO team with usually two 10GbE physical NICs attached.

[c03cadhv-2]: PS> Get-NetLbfoTeam

Name                   : NetAdapterTeam
Members                : {Ethernet 3, Ethernet 4}
TeamNics               : NetAdapterTeam
TeamingMode            : SwitchIndependent
LoadBalancingAlgorithm : Dynamic
Status                 : Degraded

[c03cadhv-2]: PS > Get-NetLbfoTeamMember

Name                    : Ethernet 3
InterfaceDescription    : Intel(R) 82599 10 Gigabit Dual Port Network Connection
Team                    : NetAdapterTeam
AdministrativeMode      : Active
OperationalStatus       : Active
TransmitLinkSpeed(Gbps) : 10
ReceiveLinkSpeed(Gbps)  : 10
FailureReason           : NoFailure

Name                    : Ethernet 4
InterfaceDescription    : Intel(R) 82599 10 Gigabit Dual Port Network Connection #2
Team                    : NetAdapterTeam
AdministrativeMode      : Active
OperationalStatus       : Failed
TransmitLinkSpeed(Mbps) : 0
ReceiveLinkSpeed(Mbps)  : 0
FailureReason           : PhysicalMediaDisconnected

[c03cadhv-2]: PS >

Run Poweshell on hyper-V host – locally or remotely and list all the switches

[c03cadhv-1]: PS > Get-VMNetworkAdapter -ManagementOS

Name           IsManagementOs VMName SwitchName     MacAddress   Status IPAddresses
----           -------------- ------ ----------     ----------   ------ -----------
InternalSwitch True                  InternalSwitch 00155D000000 {Ok}
ExternalSwitch True                  ExternalSwitch 0CC47ABC18A1 {Ok}

Add new one for LiveMigration

[c03cadhv-1]: PS > Add-VMNetworkAdapter -ManagementOS -Name LiveMigration -SwitchName ExternalSwitch

List again all switches

[c03cadhv-1]: PS > Get-VMNetworkAdapter -ManagementOS

Name           IsManagementOs VMName SwitchName     MacAddress   Status IPAddresses
----           -------------- ------ ----------     ----------   ------ -----------
LiveMigration  True                  ExternalSwitch 00155DEC5401 {Ok}
InternalSwitch True                  InternalSwitch 00155D000000 {Ok}
ExternalSwitch True                  ExternalSwitch 0CC47ABC18A1 {Ok}

Assign VLAN to new LiveMigration switch

[c03cadhv-1]: PS > Set-VMNetworkAdapterVlan -ManagementOS -VMNetworkAdapterName LiveMigration -Access -VlanId 100
[c03cadhv-1]: PS >

List all network adapters on hyper-v host, check if LiveMigration adapter is on the list.

[c03cadhv-1]: PS > Get-NetAdapter

Name                      InterfaceDescription                    ifIndex Status       MacAddress             LinkSpeed
----                      --------------------                    ------- ------       ----------             ---------
vEthernet (LiveMigration) Hyper-V Virtual Ethernet Adapter #4          58 Up           00-15-5D-EC-54-01        10 Gbps
vEthernet (InternalSwi... Hyper-V Virtual Ethernet Adapter #3          25 Up           00-15-5D-00-00-00        10 Gbps
vEthernet (ExternalSwi... Hyper-V Virtual Ethernet Adapter #2          23 Up           0C-C4-7A-BC-18-A1        10 Gbps
NetAdapterTeam            Microsoft Network Adapter Multiplexo...      20 Up           0C-C4-7A-BC-18-A1        10 Gbps
Ethernet 3                Intel(R) I350 Gigabit Network Conn...#2      14 Not Present  0C-C4-7A-64-7D-BD          0 bps
Ethernet 2                Intel(R) I350 Gigabit Network Connec...      13 Not Present  0C-C4-7A-64-7D-BC          0 bps
Ethernet 5                Intel(R) 82599 10 Gigabit Dual Por...#2      16 Up           0C-C4-7A-BC-18-A1        10 Gbps
Ethernet 4                Intel(R) 82599 10 Gigabit Dual Port ...      15 Disconnected 0C-C4-7A-BC-18-A0          0 bps

Rename vEthernet (LiveMigration) to something more user friendly

[c03cadhv-1]: PS > Rename-NetAdapter "vEthernet (LiveMigration)" -NewName LiveMigration

Assign IP address and subnet to LiveMigration adapter

[c03cadhv-1]: PS > New-NetIPAddress -InterfaceAlias LiveMigration -IPAddress 10.10.10.10 -PrefixLength 24 -Confirm:$false


IPAddress         : 10.10.10.10
InterfaceIndex    : 58
InterfaceAlias    : LiveMigration
AddressFamily     : IPv4
Type              : Unicast
PrefixLength      : 24
PrefixOrigin      : Manual
SuffixOrigin      : Manual
AddressState      : Tentative
ValidLifetime     : Infinite ([TimeSpan]::MaxValue)
PreferredLifetime : Infinite ([TimeSpan]::MaxValue)
SkipAsSource      : False
PolicyStore       : ActiveStore

IPAddress         : 10.10.10.10
InterfaceIndex    : 58
InterfaceAlias    : LiveMigration
AddressFamily     : IPv4
Type              : Unicast
PrefixLength      : 24
PrefixOrigin      : Manual
SuffixOrigin      : Manual
AddressState      : Invalid
ValidLifetime     : Infinite ([TimeSpan]::MaxValue)
PreferredLifetime : Infinite ([TimeSpan]::MaxValue)
SkipAsSource      : False
PolicyStore       : PersistentStore

[c03cadhv-1]: PS C:\Users\artur.krzywdz\Documents>

That’s it. Repeat it on every Hyper-V host in the cluster. When is done, start Failover cluster manager and check if new network appear in network resources

New network is visible

New network is visible

Right click on failover cluster –> LiveMigration networks and choose new network as the one dedicated for LiveMigration traffic only

Choose dedicated network for LiveMigration traffic

Choose dedicated network for LiveMigration traffic


About Artur Krzywdzinski

Artur is Consulting Architect at Nutanix. He has been using, designing and deploying VMware based solutions since 2005 and Microsoft since 2012. He specialize in designing and implementing private and hybrid cloud solution based on VMware and Microsoft software stacks, datacenter migrations and transformation, disaster avoidance. Artur has been in IT industry since 1999 and consulting since 2008. Artur holds VMware Certified Design Expert certification (VCDX #077).

The post Configure LiveMigration network on Hyper-V running on Nutanix appeared first on VMwaremine - Artur Krzywdzinski | Nutanix.

Create Hyper-V failover cluster on Nutanix

$
0
0

Hyper-V is one, out of three (VMware ESXi and Nutanix Acropolis aka. AHV are on the support list too) hypervisors supported by Nutanix. There are two ways you can create create Hyper-V failover cluster on Nutanix. You can do it either manually or use scripts provided by Nutanix. In this blog post I will show to create Hyper-V failover cluster on Nutanix using scripts (provided by Nutanix), for Hyper-V clusters without SCVMM and with SCVMM.

NOTE: Hyper-V on Nutanix is supported without SCVMM.
NOTE: Below procedure is applicable for NOS 4.1.X and older ONLY

Step 1 – Requirements

  • AD functional level 2008R2 or newer
  • ADWS – Active Directory Web Services installed
  • Open ports between Nutanix\Hyper-V cluster and AD – you can find all necessary ports either on Nutanix documentation or on my blog Nutanix network diagram.

Step2 – Create Nutanix cluster.

Before you create hyper-v failover cluster on Nutanix, you have to have Nutanix cluster created and up and running. In one of my previous posts you can see how to create Nutanix cluster either using command line or web interface – Nutanix Basics – create Nutanix cluster.

Step4 – join Hyper-V nodes to Active Directory domain

  • Log in to CVM and run setup_hyper-v.py setup_hosts – script will join servers into Active Directory, remove 1GBps from network bound if 10GBps is used, set up NTP, DNS IP addresses and set up hostnames.

NOTE: servers will reboot after script is completed.
nutanix@NTNX-14SM15050017-A-CVM::~$ setup_hyperv.py setup_hosts
Getting the cluster configuration ... Done
Getting information about each host ... Done
Please enter the IP address of the domain controller: 
Configuring NTP ... Done
Please enter the fully qualified domain name (e.g. corp.contoso.com) to which the hosts will be joined: gso.lab
Will a 10G switch be used for this cluster ([Y]/N)? Y
Please enter the domain account username that has permissions to join the hosts to a new domain: gso.lab\artur.krzywdz
Please enter the password for gso.lab\artur.krzywdz:
Please enter a name for the cluster (max 11 characters). Each host will be named using this as a prefix followed by the                  host number: gsocls3
Please enter the name for host 1 (cvm) (Press ENTER for gsocls3-1):
Please enter the name for host 2 (cvm) (Press ENTER for gsocls3-2):
Please enter the name for host 3 (cvm) (Press ENTER for gsocls3-3):
Please enter a name for accessing the Nutanix SMB shares (max 15 characters). Press ENTER for gsocls3-smb:
Setting external IP address ... Done
Joining nodes to the domain ...
  2 nodes remaining
  Done
Rebooting hosts of CVMs  ...
Rebooting the host to make domain joining take effect ...
nutanix@NTNX-14SM15050017-A-CVM:~$
Broadcast message from root@NTNX-14SM15050017-A-CVM
        (unknown) at 7:34 ...

The system is going down for power off NOW!

Step5 – Create Hyper-V failover cluster on Nutanix

Hyper-V on Nutanix requires Active Directory functional level 2008R2 or newer. If you have AD on 2012R  functional level you will not be prompted to preform any manual action. Configuration scripts will do the job from end to end. In my lab I have AD on functional level 2008R2 and, as you can see below, configuration is partially automated.

nutanix@NTNX-14SM15050017-A-CVM:~$ setup_hyperv.py create_failover_cluster
Getting the cluster configuration ... Done
Getting information about each host ... Done
The hosts are joined to domain gso.lab

Please enter the domain account username that has local administrator rights on the hosts: gso.lab\artur.krzywdz
Please enter the password for gso.lab\artur.krzywdz:
Verifying credentials for accessing localhost ... Done

Adding "gsocls3-2.gso.lab","gsocls3-3.gso.lab" to the failover cluster ...
  1 nodes remaining
  Done
Preparing to join the Nutanix storage cluster to domain ... Done
Joining the Nutanix storage cluster to the domain ... manual steps needed
Please log into the active directory domain controller and run the following commands in a powershell window. When asked for a password, please create a new password. You will have to re-enter the same password here later:

Import-Module ActiveDirectory
dnscmd.exe /recordadd 'gso.lab' 'gsocls3-smb' 'A' ''
$password=(get-credential gsocls3-smb).password
New-ADComputer -Name gsocls3-smb -SAMAccountName gsocls3-smb `
  -UserPrincipalName gsocls3-smb@gso.lab -PasswordNeverExpires:$true `
  -CannotChangePassword:$true -AccountPassword $password -Enabled:$true `
  -DisplayName 'Nutanix storage cluster on gsocls3-smb' `
  -Description 'Nutanix storage cluster on gsocls3-smb' `
  -DNSHostName gsocls3-smb.gso.lab
$computer = [adsi]("LDAP://" +
  (Get-ADComputer gsocls3-smb).DistinguishedName)
$computer."msDS-SupportedEncryptionTypes" = $(0x08 -bor 0x10)
$computer.SetInfo()

Press ENTER to continue ...
Please provide the password for the Nutanix storage computer object created using the manual steps:
Joining the Nutanix storage cluster to the domain ... Done
nutanix@NTNX-14SM15050017-A-CVM:~$

Step 6 – add Nutanix SMB shares as default storage to Hyper-V hosts – Hyper-V manager

  1. Start Hyper-V manager and connect to each Hyper-V host
  2. In Hyper-V settings – provide UNC path to container
Add Nutanix container to Hyper-V host

Add Nutanix container to Hyper-V host

Step 7 – Install updates on Hyper-V cluster

DONE. Now you can start provisioning VM on new and shiny Hyper-V cluster on Nutanix.


About Artur Krzywdzinski

Artur is Consulting Architect at Nutanix. He has been using, designing and deploying VMware based solutions since 2005 and Microsoft since 2012. He specialize in designing and implementing private and hybrid cloud solution based on VMware and Microsoft software stacks, datacenter migrations and transformation, disaster avoidance. Artur has been in IT industry since 1999 and consulting since 2008. Artur holds VMware Certified Design Expert certification (VCDX #077).

The post Create Hyper-V failover cluster on Nutanix appeared first on VMwaremine - Artur Krzywdzinski | Nutanix.

Viewing all 55 articles
Browse latest View live


<script src="https://jsc.adskeeper.com/r/s/rssing.com.1596347.js" async> </script>